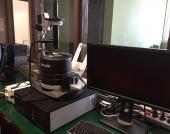
NT-MDT NTEGRA Prima Atomic Force Microscope (AFM) and Scanning Tunnelling Microscope (STM)
AFM/STM that can perform PFM, MFM, PFM and many other modes, equipped with in-plane and out of the plane magnetic field and sample heaters. The instrument is acoustically isolated and sits on top of an active anti-vibration table (Accurion Micro-40) for low noise measurements.
Scanning by sample:
- Heads:
- STM head:
- Universal SPM head, compatible with 1m optics, laser 650 nm.
- Inserts for universal SPM head:
- Insert for contact and non-contact AFM, SSR and PFM
- Insert for EFM, KPM, SCM
- Insert for AFM measurements in liquid
Scanning by tip:
- Scanner made of nonmagnetic materials that can be used for MFM. Scanner XYZ 90х90х9 um, reading with capacitive sensors in “closed loop” mode. Laser wavelength: 650 nm.
Optics
- Color CCD 2/3" Stingray F-504 FireWire camera
- Zoom: manual and fine focus 5 mm range
- Numerical aperture: 0.1
- Amplification: 85X -1050X
- Field of view: 4.5 @ 0.37 mm (2 with measuring head)
- Resolution: 3 μm (standard), 1 μm with 10X objective (N/A=0.3)
Controller
The instrument is driven by an electronic controller that includes the power supplies for the scanners (+-150V), two digital Lock-In amplifiers (1 kHz – 5 MHz) and 1 analogue Lock-in amplifier, 10 separate ADC channels 500 kHz (18 bits), 1 multiplexed ADC 250 kHz, 16-bit (12 channels), 320 MHz DSP
Piezoresponse Force Microscopy (PFM)
For PFM measurements, an external bias unit of +- 50V is available fully integrated in the hardware and software.
Magnetic Force Microscopy (MFM)
MFM uses a special scanner made of nonmagnetic materials (scan by tip) described above.
- Out of plane magnetic field:
- Max: 0.05 Tesla.
- Sample size: 20x20 mm
- Field locus size: 6 mm diameter
- Field sensor: Hall effect probe
- In plane magnetic field:
- Max: 0.35 Tesla.
- Pole distance: 7-20 mm
- Sample size: up to 15 mm (diameter) x 3 mm (height)
- Field sensor: Hall effect (calibrated up to 0.2 T)
Hot stages
Two hot stages are available that enable measurements to be carried on up to 300ºC. Temperature control is performed with a dedicated heater driver and temperature control unit.
- Hot stage 1
- Tmax: 150ºC
- Temperature stability: 0.05ºC
- Sample size: 15x15x2 mm
- Thermometer: Pt resistor
- Hot stage 2 (only for scanning by tip)
- Tmax: 300ºC
- Temperature stability: 0.02ºC
- Sample size:15x17x1.5 mm
Acquired May 2013 and managed by Vladimir Khomchenko
Location: TAIL-UC Trace Analysis and Imaging Laboratory (F.16)
How can you have access to it?
This instrument is available to the UC scientific community, external scientific community and industrial users under the general UC policy for access to the UC analytical platforms. Please contact the instrument responsible or TAIL-UC director for details of instrument availability and usage charge rates.
Co-financiamento:

Standard Operating Procedure
Training
Atomic Force Microscopy trainingTypical Data
Piezoresponse Force Microscopy (PFM) image of ferroelectric domains in a multiferroic ceramic


